Alarm Motion Sensor Not Detecting Movement? Check Testing, Coverage and Mode Settings
.sl-alarm table{border-collapse:collapse;width:100%;margin:24px 0}.sl-alarm th,.sl-alarm td{border:1px solid #bccbd0;padding:12px;text-align:left;vertical-align:top}.sl-alarm th{background:#edf4f2}.sl-alarm .table-scroll{overflow-x:auto}.sl-alarm figure{max-width:800px;margin:28px auto}.sl-alarm img{display:block;max-width:100%;height:auto;margin:auto}.sl-alarm figcaption{font-size:14px;line-height:1.6;color:#435b62;padding-top:10px}
You walk across the room, wave at the detector and see no light. The immediate conclusion is that the sensor is broken. But an alarm motion detector may not display a light during normal operation, may be excluded from the current armed mode, or may require a particular walk-test routine before repeated movements produce useful feedback.
Check communication, actual detection and the alarm response as three separate stages. A successful test-button message proves something different from a detected walk, and a detected walk does not necessarily trigger an alarm in every mode. This guide concerns intrusion motion sensors, not the image-based motion alerts on a security camera.
Choose the right troubleshooting branch
Start with the exact product, generation and current status. A detector listed offline needs a different initial check from one online but not responding to a particular route. A detector producing an event without a phone notification may already be doing its sensing job.
| Observation | First investigation | What it does not establish |
|---|---|---|
| Sensor is offline | Power, enrollment and local communication | That sensitivity is too low |
| Test button is acknowledged, walk is not | Correct walk-test procedure and physical coverage | That the room is fully protected |
| Motion appears in history, no siren | Mode assignment, delays and event rules | That the sensing element has failed |
| No visible LED during normal use | Model-specific indication behavior | That the sensor has no power |
| Siren or panel event occurs, no phone alert | Reporting, account and notification path | That moving the detector will solve the issue |
For camera events, use our camera motion guide. A camera’s object classification and recording schedule should not be confused with a dedicated alarm detector’s sensing and zone rules.
Do not use an unplanned live alarm as the first test
Confirm the approved testing procedure and coordinate with the monitoring provider before intentionally creating alarm events. A product’s local walk-test function and a provider-side test hold can have different effects. Never assume the word Test disables all emergency responses.
Keep panic, duress, smoke and medical functions outside an improvised intrusion exercise. Tell household members what is being checked and restore normal settings afterward. Our alarm testing guide explains that preparation and handover.
A controlled test should answer one question at a time. Repeatedly arming, walking and disarming without documenting the state can make normal delays or exclusions look like an intermittent sensor fault.
First prove that the hub can hear the device
Use the manufacturer’s communication test for the identified detector. Confirm the name announced or logged, not just that some sensor message appeared. If several devices were enrolled together, a labeling mistake can lead you to watch the wrong history entry.
Check local communication at the installed position. A test performed beside the base station may succeed while the final location remains unreliable. Furniture, construction and other changes can make an old successful installation result irrelevant.
If communication fails, review the approved battery, mounting state and enrollment before adjusting detection sensitivity. For an external reporting problem rather than the local sensor link, use the communication-failure guide.
Then prove that an actual walk is detected
Follow the product’s preparation interval and test route. Leaving the room matters when the documented procedure requires the detector to settle before the next movement. Constantly moving in front of it can invalidate the comparison you are trying to make.
SimpliSafe’s Gen 2 test guide distinguishes a button press confirming communication from a motion test that includes leaving the room for at least 15 seconds before re-entering. It also notes that an inaudible base-station announcement can be mistaken for a failed test.
That interval is not a universal rule for other detectors. Abode’s Motion Sensor instructions describe a different preparation period and indicate that the LED is normally off outside relevant conditions. Identify the exact device rather than applying whichever timer is easiest to remember.
Check the armed mode and sensor assignment
Many households deliberately leave interior motion detection inactive while people are home. Testing in that occupied-home mode can therefore demonstrate the intended behavior rather than a failure. Inspect the actual configuration, including any bypassed or excluded devices.
Ring’s motion-detector guide says its default intrusion arming is Away-only and distinguishes Room from Entryway placement settings. Those choices affect the response and delay; they are not simply decorative location labels.
Use our mode guide to review the household routine. A detector online in the app can still be intentionally inactive in the mode selected overnight.
Identify the generation before copying mounting advice
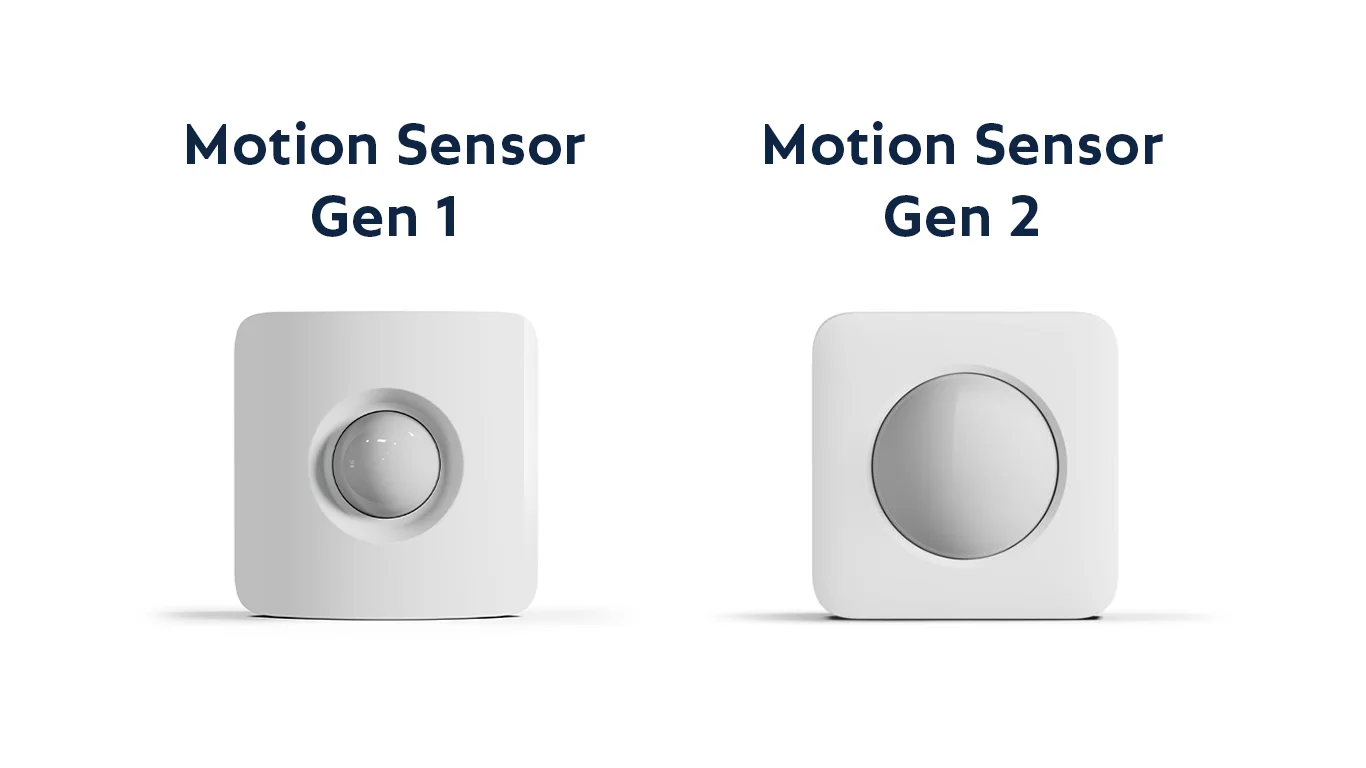
A universal instruction to mount every detector at one height is not reliable. SimpliSafe’s Gen 2 installation guide, for example, gives a six-foot mounting position and a defined orientation. Ring provides different model-specific heights in its own documentation.
Do not rotate a new detector upside down because a tip for an older pet-related installation suggested it. The lens pattern, supported mounting and sensitivity behavior belong to the actual model. Use the current manual and verify the resulting route.
Check the required view, not only the room’s center
Decide which approach the detector must cover. A successful walk immediately in front of the sensor does not show that the far doorway or path around a large cabinet is detected. Walk the actual route in the approved test mode.
Inspect furniture, curtains, shelves and stored objects that may have changed since installation. A sensor partly hidden by a bookcase can remain online while losing the view it was meant to monitor. The app’s healthy communication status will not necessarily reveal that obstruction.
Check whether the device should be on a wall, in a corner or at the edge of an approved shelf position. Do not place it deep behind decorative objects merely to hide the hardware. Reposition only within the manufacturer’s supported arrangement, then repeat the same test.
Test the human task you need, not arbitrary hand movement
A detector installed to identify a person crossing a room should be tested with ordinary walking through the intended coverage, not just a hand waved beside the lens. The latter is a different distance and movement pattern and can produce misleading expectations.
Use a consenting helper where useful, so one person can observe the panel while the other follows the route. Keep the test predictable and documented. Do not stage a surprise event that could cause an unnecessary emergency response.
Where accessibility, an unusual room or a narrow route creates uncertainty, ask the installer to demonstrate that the selected model covers the task. Adding more sensitivity is not a substitute for selecting a suitable position and device.
Pet settings need a coverage check too
A pet-related setting can change sensitivity or the supported installation assumptions. It should not be treated as a universal switch that removes animals while guaranteeing identical human detection in every arrangement.
SimpliSafe’s missed-motion guidance separates the physical sensitivity switch on Gen 1 from the app-based Pet Mode on Gen 2. That difference is another reason to identify the generation before making adjustments.
Our pet-friendly sensor guide addresses placement and household testing. After a change, verify the intended human route as well as ordinary animal movement; reducing nuisance alerts alone is not the full acceptance test.
Battery and cover checks should stay model-specific
Read the named device’s battery status and approved replacement specification. A lit indicator does not establish that a battery is suitable for sustained reliable operation, and a familiar battery shape does not prove the chemistry matches.
Use the owner’s service procedure where one is provided. Close the cover and refit the mount normally afterward. An incorrectly fitted housing can create a tamper warning separate from the detection issue.
See the tamper guide for that branch. A system-backup battery warning belongs to the backup-supply guide, not automatically to the motion detector you happen to be testing.
Separate a reporting delay from a sensing failure
The time a phone notification appears may include steps after the detector has already reported locally. Compare the panel or hub’s documented test result with the app’s event history and notification settings before diagnosing the sensor itself.
Also check whether your test expects an immediate siren from a zone configured with an entry delay. Waiting for the wrong output can make a working system seem inactive. Record which response is supposed to occur in the selected mode.
A phone’s quiet notification setting does not repair itself when you replace the sensor. Follow the failed stage through the local panel, account and intended recipient instead of treating all missing alerts as missing motion.
When a restart or re-enrollment is appropriate
Follow a manufacturer-directed restart only after preserving the status and relevant settings. It can be a useful diagnostic step, but repeated resetting does not correct a blocked lens or the wrong mode assignment.
Re-enrollment may change the device name, zone or automations. Record those before removing anything, then verify the new configuration as if the sensor were freshly installed. Deleting the device without restoring its role leaves a coverage gap.
If the detector fails controlled tests on a supported mount with a verified battery and communication path, contact the manufacturer or installer. Provide the exact model and observed results rather than guessing which internal component needs repair.
A two-part acceptance record
| Check | Record a concrete result |
|---|---|
| Communication | Named detector acknowledged at its installed location |
| Preparation | Model-specific walk-test procedure followed |
| Coverage | Normal approach from the relevant entrance detected |
| Mode behavior | Correct inclusion and response in the intended armed state |
| Household conditions | Relevant furniture and pet arrangement evaluated |
| Restoration | Testing ended and normal monitoring confirmed |
Repeat the relevant checks after moving the device, changing a major piece of furniture or altering the mode configuration. A new arrangement should not inherit an old passed result automatically.
Frequently asked questions
The button can prove communication without testing the sensing coverage. Follow the separate motion test, preparation interval and placement instructions.
Why does it work in Away but not Home?
That may be the intended mode assignment. Confirm the settings and household requirements rather than assuming a hardware fault.
Should I increase sensitivity to maximum?
Not before checking the test method, view and mode. A sensitivity change can affect nuisance alarms and should be evaluated against the actual task.
Does no LED mean the battery is dead?
Not universally. Some models keep the indicator off during normal operation. Check documented status and test behavior.
The alarm directory contains the related installation and reporting guides. Finish with proof of the required detection, not merely a device that appears in the app.