How to Install a Security Strike Plate: Fit, Reinforcement and Final Checks
A strike plate is easy to overlook because it is small, inexpensive-looking and partly hidden when the door closes. Yet it is the receiving side of the lock: the bolt needs to enter the right opening and transfer force into suitable support. A poorly fitted plate can make a new lock bind, while an impressive plate attached to damaged material can provide misleading reassurance.
This guide explains how to evaluate and fit a compatible residential strike or reinforcement kit. It is not a universal drilling template. Timber frames, hollow-metal doorsets, uPVC systems and rated entrances have different requirements, so the exact hardware instructions and the actual construction must govern the work.
What a strike plate does
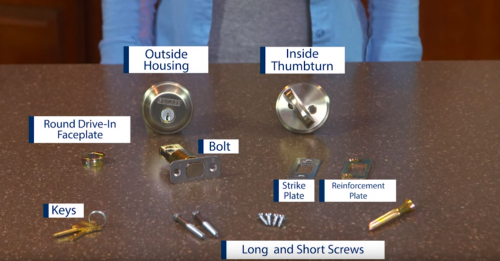
The strike is fixed to the frame and receives the latch or bolt. The faceplate on the edge of the door is a different component. Some installations also use a reinforcement plate or strike box behind the visible strike, with fixings designed to engage suitable structure.
Do not assume a latch strike and a deadbolt strike are interchangeable. Their opening geometry, lip and intended interaction with the mechanism differ. A deadlatching mechanism can also depend on its auxiliary component resting in the intended position rather than disappearing into an enlarged hole.
Schlage’s hardware glossary distinguishes the strike, faceplate and other parts. Knowing those names makes it easier to order the correct component and explain a problem to the supplier.
Decide whether this is a replacement, reinforcement or repair
A like-for-like replacement on a sound prepared frame is different from enlarging an opening for a new kit. Repairing a split jamb is different again. Identify which job you actually have before gathering tools or removing the working hardware.
| Situation | What it usually calls for | What not to assume |
|---|---|---|
| Original plate is damaged but frame is sound | Compatible replacement and a fit check | Any plate with similar screw spacing will work |
| Lock binds only when door is closed | Alignment diagnosis before modification | The hole simply needs to be made much larger |
| Frame is split or decayed | Structural repair or replacement assessment | A longer plate restores damaged wood by itself |
| New reinforcement kit is being fitted | Preparation and fixings specified for that kit | Existing holes or screws are automatically suitable |
| Metal, uPVC or fire-rated assembly | Manufacturer-compatible procedure or specialist installation | Timber-door DIY instructions apply unchanged |
If the door cannot currently secure, make arrangements for legitimate access and protection during the repair. Do not begin a job late in the day with an unidentified replacement part and no way to restore the original arrangement.
Check door alignment before changing the strike
With the door safely open, operate the lock through its intended travel. Then compare closed operation. Note whether the bolt meets the upper, lower or side edge of the receiving opening and whether the door needs to be lifted or pulled hard to lock.
Look at hinge condition and the gaps around the door. Weather seals, loose hinges, frame movement or a sagging leaf may be responsible. Moving the strike to accommodate a major alignment defect can hide the symptom while the door continues to deteriorate.
Our door-alignment troubleshooting guide explains the difference between a mechanism that fails independently and one affected by the closed position. Where the cause is uncertain, diagnose it before cutting material away.
Match the new hardware to the actual lock
Record the lock brand and model, the type of bolt or latch, the existing strike dimensions and the frame material. Check the replacement’s instructions for required recesses, boxes, reinforcement and compatible door preparation. The product’s intended use should be explicit.
Measure clearances, not just the plate’s outside dimensions. A thicker replacement can prevent the door from seating, while an inappropriate lip can interfere with the latch. A bolt must have adequate receiving depth for full travel without bottoming out.
Some locks require the supplied reinforcement components to achieve the advertised installation specification. Do not remove a part because the visible plate looks sufficient or because it is inconvenient to fit. Ask the manufacturer how the exact assembly should be prepared.
Understand the supporting material
A wooden jamb may sit in front of a structural member, an installation gap or an adjacent sidelight assembly. A metal frame may require different fasteners or reinforcement altogether. Establish the construction before choosing screw length or drilling depth.
Decorative trim is not a substitute for structural support. Nor is a hollow profile automatically suitable for a fastener sold for timber. If you cannot identify what the proposed fixing will engage, stop and obtain competent advice rather than treating a longer screw as a universal solution.
Also consider concealed services and nearby glazing. Drilling where you cannot assess the route may damage more than the door. A professional installer should be able to explain why the selected method suits that particular opening.
Prepare the work area and keep the original parts
Have the exact kit instructions, correct hand tools, suitable protective equipment and a reliable way to keep the door controlled while working. Follow any product restrictions on powered drivers; overtightening can distort hardware or damage threads.
Photograph the original installation and retain its parts until the new arrangement has passed testing. Protect nearby finishes and keep debris away from the lock mechanism. If the job reveals unexpected damage, do not continue merely because the replacement is already unpacked.
For a rated or managed entrance, approval and competent installation may be required before any change. This guide does not replace a manufacturer’s field-modification limits or local building rules.
Fit the plate using the kit’s actual preparation instructions
Remove the old strike only once the replacement has been checked. Inspect the exposed material, existing holes and any box or reinforcement behind it. A deteriorated recess or stripped fixing point requires a suitable repair, not simply a cosmetic cover.
Position the new assembly in accordance with the template and verify its relationship to the bolt. Where preparation is permitted, remove only the material specified and keep the seating surface even. An excessively deep recess or a rocking plate can create poor support and fit.
Prepare pilot holes and install fixings only as directed for the product and substrate. Different screws in the kit may have different roles. A screw intended to connect lock housings is not necessarily the right fixing for a timber frame, even if it fits through the plate.
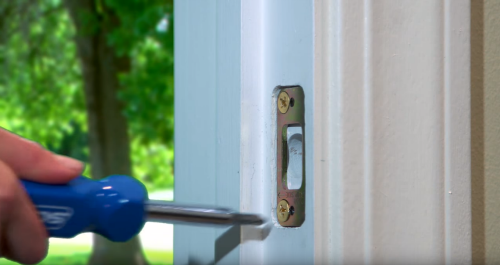
Seat the components firmly without distorting them. If something will not sit correctly, find the cause instead of forcing the screw or pulling the frame out of position. Check that the door still closes naturally before proceeding to final locking tests.
Test open, then closed, then under normal daily use
Begin with the door open and verify that the lock itself operates smoothly. Test authorized operation from the relevant sides while maintaining a safe alternative access arrangement. Only then close the door and compare the effort required.
The bolt should reach its intended position without excessive pressure on the door. If it drags, identify the exact point of interference and consult the preparation guidance. Do not repeatedly slam the door or enlarge the opening indiscriminately until the key turns.
Finally check normal entry and exit, not just the bolt. The latch should catch, handles should return normally, seals should remain appropriate and any closer should still perform its function. A security upgrade that creates a difficult exit or an unreliable latch is incomplete.
Common installation problems and what they mean
| Symptom | Possible cause | Better response |
|---|---|---|
| Plate moves as screws tighten | Uneven seating or unsuitable holes | Recheck preparation rather than forcing the fitting |
| Door will not sit fully closed | Plate thickness, lip or frame position interferes | Confirm the correct part and allowed preparation |
| Bolt enters but does not extend fully | Depth or alignment problem | Check the manufacturer’s required travel and receiving space |
| Key is stiff only when shut | Pressure or misalignment at the receiver | Compare door gaps and contact points |
| Fixings will not hold | Damaged or unsuitable supporting material | Repair the substrate or seek professional installation |
| Problem returns after weather changes | Movement in the door or frame | Assess the underlying alignment and moisture issue |
One successful turn is not the whole acceptance test. Operate the entrance several times as an ordinary user would and check that no unusual force or special maneuver has become necessary.
When reinforcement is not enough
A strike upgrade cannot restore a badly deteriorated frame or a door leaf with extensive damage around the lock. It cannot establish a tested security rating for an untested combination of parts. Where the rest of the assembly is weak, a complete assessment is more useful than repeatedly replacing the receiving plate.
Our door-reinforcement guide covers hinges, leaf construction and the wider frame. For a replacement entrance, the front-door buying guide explains how to compare complete configurations.
After an attempted break-in, ask the repairer to assess concealed and surrounding damage. A plate that hides a crack is not evidence that the frame has regained its original support.
Special cases: apartments, metal frames and multipoint doors
Apartment doors can be part of a managed fire and access arrangement. Obtain the required permission and use appropriate components. Do not assume that a product described as residential is approved for every shared-building entrance.
Metal frames may use threaded, reinforced or other manufacturer-specific fixing methods. uPVC multipoint systems have receivers designed to work with their own locking geometry. A long timber-door strike kit is not a universal upgrade for either.
If your entrance falls outside an ordinary compatible prepared timber installation, professional advice is often the efficient route. It avoids damaging a frame whose repair costs far more than the plate.
Maintenance after installation
Notice changes in closing effort and inspect visible fixings when a problem appears. Do not automatically tighten every screw harder; recurring loosening can indicate inadequate support or movement that needs investigation.
Keep the hardware model and instructions with your household records. If the door is later replaced, repainted or adjusted, the person doing the work should know which reinforcement system is present. Recheck operation after work around the opening.
Use only manufacturer-approved maintenance products where relevant. Lubricating a cylinder does not repair a misaligned strike, and coating the receiving area in oil can conceal dirt without solving the actual fit.
Frequently asked questions
Can I install a security strike plate myself?
A compatible replacement on a sound, understood frame may be a reasonable task for someone competent with the specified tools. Unknown construction, damage, rated doors or significant preparation changes justify professional help.
Are all security strike plates the same?
No. Opening shape, lip, thickness, reinforcement, fasteners and intended substrate differ. Match the lock and frame, not just the finish.
Do longer screws always improve security?
Only when they are appropriate for the specified installation and engage suitable support. Length alone is not a performance rating.
Why does the deadbolt work open but not closed?
That points toward interaction with the frame or door position, although it is not conclusive proof that every internal component is healthy. Diagnose alignment before replacing or enlarging parts.
Should I enlarge the strike opening until the lock works?
No. Excessive modification can weaken support or interfere with the intended mechanism. Correct the cause and follow the product’s allowed preparation.