Installing a Deadbolt on a Steel Door: Prepared Openings, Reinforcement and Safe Fit
Replacing a compatible deadbolt in an already prepared steel door can be a straightforward hardware job. Creating a new lock opening in an unidentified steel doorset is a different project. Thin skins, internal reinforcement, frame preparation and any fire rating all affect what can be installed safely and correctly.
Do not begin by buying a stronger drill bit. Begin by identifying the door, the existing preparation and the exact lock. This guide explains the decision points, the work that may be suitable on a prepared opening and the questions that should be resolved by the door supplier or a qualified installer before cutting new holes.
Which installation are you actually doing?
| Situation | Likely scope | Main check |
|---|---|---|
| Like-for-like replacement in a sound prepared door | Remove and fit compatible hardware | Dimensions, bolt arrangement and manufacturer instructions match |
| Different lock in existing holes | Compatibility assessment before replacement | Preparation, reinforcement and frame receiver suit the new product |
| Additional deadbolt where no opening exists | Door and frame modification assessment | Authorized location, internal support and permitted field work |
| Fire-rated or managed entrance | Approved components and appropriate professional procedure | The change preserves the required assembly |
| Damaged door or frame | Repair or replacement assessment first | A new lock will have sound support |
These are different projects even when the same retail deadbolt is being considered. A package containing a paper template is not authorization to alter every door on which the template fits.
Identify the steel-door construction
A residential steel-faced door can have a core and internal support arrangement different from a commercial hollow-metal door. The visible metal surface does not tell you where reinforcement lies or what hardware preparation is approved.
Look for labels, manufacturer information and installation records. Photograph the door edge and existing hardware. Ask the supplier about permissible replacement and field preparation, especially if you intend to add a new bore.
The Steel Door Institute’s hardware-preparation guidance illustrates why steel-door and frame preparation is a defined technical subject rather than simply drilling through a harder material. Use the applicable product requirements for your door.
Check fire labels and exit requirements before modifying anything
A fire-rated door is part of a specified assembly. Hardware that is itself labeled or rated does not automatically belong on every rated door. New preparation or an altered operating arrangement can require approval or another authorized procedure.
The Steel Door Institute’s FAQ explains that field modifications and compatible listings need to be addressed through the relevant manufacturer, listing process and authority. Do not infer blanket permission from a general statement that some site preparation is allowed.
Also consider inside release. An additional keyed interior lock or a more complicated sequence may be inappropriate for a required exit. Obtain the relevant local advice before choosing the hardware, not after the door has been drilled.
Measure the preparation, not just the visible trim
Record door thickness, backset, face-bore dimensions, edge preparation and the relationship to the existing handle or lock. Check that the inside and outside housings have room to sit correctly without colliding with trim or glazing.
The receiving frame matters too. A deadbolt needs appropriate space for full travel and support for its strike. A metal frame may use a different fixing and reinforcement method from the timber-jamb illustration included with a general residential kit.
Schlage’s template library separates product families and includes preparation distinctions for different materials. Select the exact template; do not use the first diagram returned by a search.
Why internal reinforcement matters
The lock’s mounting load should be supported as the door manufacturer intends. Tightening a housing against an unsuitable thin skin can distort the surface or leave the mechanism poorly supported. A lock can look firmly attached while its internal geometry is wrong.
Ask whether the door already contains suitable reinforcement for the proposed hardware. If not, use an approved reinforcement arrangement or obtain a different installation assessment. Do not pack the cavity with improvised material and assume the result matches the intended construction.
This issue is particularly important when moving a lock to a new position. The original location may have been prepared and supported in a way the new area is not.
Choose the exact lock and strike together
Compare the product’s intended door-thickness range, backset options, bolt, tailpiece or connecting mechanism and required faceplate. A familiar-looking cylinder does not establish that every hidden part will fit the old preparation.
Check which strike and reinforcement components are supplied or required. Different fasteners in a kit can serve different roles; screws used to connect the two lock housings are not automatically suitable for attaching a strike to a metal frame.
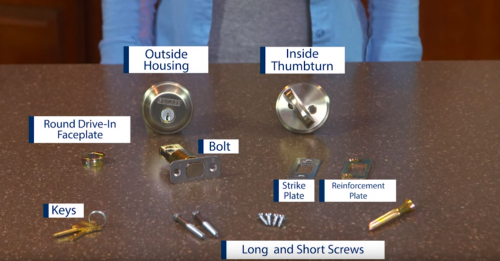
For a smart deadbolt, include the interior electronic housing and supported cable routing in the compatibility check. The door must work mechanically before calibration or app setup can be considered successful.
Before removing the old lock
Arrange a safe way to keep the property accessible and secure during the work. Have the approved replacement and instructions available, rather than discovering a dimension mismatch after the only functioning lock is dismantled.
Photograph the original arrangement and keep its parts together. Inspect normal door alignment first. If the existing lock only works when the door is lifted, changing the cylinder alone may not solve the complaint.
For an authorized like-for-like replacement, follow the manufacturer’s removal and fitting sequence. For an unfamiliar commercial or rated assembly, use a qualified professional rather than assuming the old hardware is a simple residential pattern.
Replacing hardware in a compatible prepared opening
Inspect the exposed preparation and supporting material after removal. Look for distortion, corrosion or damage that was hidden by the trim. Stop if the new product cannot be installed as specified without an unplanned modification.
Fit the bolt and housings in the orientation and sequence described by the manufacturer. The connecting parts need to engage correctly, and any adjustable backset must match the measured preparation. Do not force an incompatible assembly into position by tightening the screws harder.
Schlage’s residential installation guide begins with a properly prepared and aligned door and distinguishes the roles of the supplied parts. Its exact steps and fasteners should be used only for the covered products and suitable substrate.
Seat the hardware securely without distorting the door or stripping threads. If the lock becomes stiff as it is tightened, investigate fit and assembly rather than leaving it loose as the final solution.
Adding an opening where no deadbolt exists
Confirm that the door and frame are approved for the proposed preparation and that the chosen position has suitable support. Check internal components, adjacent glazing and any electrical access-control features. This assessment should happen before a cutting tool touches the door.
Use the exact product template and the door manufacturer’s permitted process. A generic hole size, drill speed or position from a timber-door tutorial is not a complete steel-door specification. Cut edges and disturbed finishes may also need approved corrosion protection.
If the manufacturer cannot confirm a suitable field modification, compare an approved alternative or a factory-prepared replacement. Avoid turning an unsupported modification into a sunk-cost problem by continuing simply because the first hole has been started.
The receiving frame needs its own preparation
The bolt must extend into the strike without hitting an internal obstruction or stopping short. A metal frame may require a specific strike box, reinforcement or threaded fixing arrangement. A timber reinforcement kit should not be installed into it by analogy.
Check alignment before altering the receiver. If the door is sagging, moving the strike can conceal the symptom while the underlying problem continues. The Steel Door Institute’s troubleshooting guide addresses common steel-door and frame installation problems and notes the limits of generic repairs.
Our strike-plate guide explains the supporting questions. A plate that covers the opening neatly does not prove full bolt travel or adequate anchoring.
Open-door testing comes before closed-door testing
With the door safely open and controlled, operate the new lock from its intended sides. The key and thumbturn should move through their specified travel without unusual resistance. For an electronic model, complete the manufacturer’s required sequence in the correct order.
Retract the bolt before closing the door. Then test normal closed operation with a legitimate backup route available. If the mechanism works open but binds closed, investigate alignment and receiving depth rather than forcing it.
Confirm that the ordinary latch, handle, closer and seals remain functional. A deadbolt installation is incomplete if it makes another required part of the entrance unreliable.
Common problems after installation
| Symptom | Check before replacing parts |
|---|---|
| Key is stiff with the door open | Assembly orientation, connecting components and housing fit |
| Bolt binds only when closed | Strike alignment, full receiving depth and door position |
| Housings do not sit flush | Preparation, reinforcement and incompatible internal parts |
| Metal skin deforms while tightening | Support and approved mounting arrangement |
| Smart motor reports a jam | Manual mechanical travel before electronic troubleshooting |
| Door no longer latches normally | Interference from the new hardware or changed alignment |
Do not enlarge holes indiscriminately or remove structural material to make a mismatched part fit. Return to the documented preparation or seek professional correction.
Keep corrosion protection and labels intact
New preparation or handling can expose bare metal or damage coatings. Follow the door manufacturer’s finishing requirements and protect nearby operating components. Painting the keyway, seals or a rating label is not an appropriate way to tidy the job.
Our metal-door refinishing guide covers identifying the substrate, protecting hardware and avoiding incompatible coatings. The original finish and any modified areas should remain part of the maintenance record.
Inspect for recurring water or corrosion problems rather than repeatedly touching up the same area. A lock upgrade does not correct a leaking or deteriorating frame.
What a professional quotation should explain
Ask whether the work is a compatible replacement or a field modification, what reinforcement is required and how any rated-door obligations are handled. The quote should identify the exact lock and the frame work rather than listing only a generic deadbolt.
Clarify who handles adjustment if the door settles and what records you receive. Product identification and installation documentation are valuable when future maintenance is needed.
For a security upgrade, ask why the selected arrangement addresses the property’s actual weakness. A more expensive cylinder is not necessarily the priority when the frame or existing preparation is damaged.
Frequently asked questions
Can a deadbolt be fitted to any steel door?
No universal permission applies. The door’s preparation, reinforcement, configuration and any rating must support the proposed installation.
Can I use a wood-door installation kit unchanged?
Not without confirming every relevant part and fixing method is suitable. The steel frame and internal support may require different components.
Does a fire-rated lock preserve every fire door’s rating?
No. The door must be approved for the hardware application and any modification must follow the appropriate process.
Why does the new lock work open but not shut?
The door-to-frame relationship or receiving space may be creating resistance. Diagnose alignment and full bolt travel rather than forcing the key.
What should I do before drilling?
Identify the door and frame, obtain the exact hardware template and confirm that the proposed preparation is authorized and properly supported.