How to Install a Door Chain or Swing-Bar Guard: Fit, Fixings and Safety Checks
A door chain is a small fitting with a surprisingly important installation detail: the screws must attach to something capable of supporting it. A neatly positioned chain on thin decorative trim can look reassuring without providing the restraint its owner expects. A swing-bar guard introduces an additional challenge because its rigid parts must meet at the correct angle.
Choose the device for the actual door, then lay out both components before making holes. This guide explains the fitting process, the differences between chains and guards, and the checks that keep the entrance usable. Neither product should be mistaken for a replacement for the primary lock or for a complete forced-entry upgrade.
What job is the device intended to do?
A chain or swing-bar guard normally limits opening so an occupant can communicate with someone outside without immediately opening the door fully. That limited-opening function is different from the resistance of a properly specified deadbolt and frame. Do not infer a tested burglary rating from a thick-looking chain or arm.
If your main objective is identifying callers, a suitable viewer or intercom may let you keep the door closed altogether. If the main concern is a weak entrance, inspect the lock, strike, frame and hinges. Our door-chain alternatives guide separates these options so you do not buy the wrong solution.
A chain can still be useful when compatible and installed correctly. The point is to match expectations to its function, not declare every accessory either worthless or invincible.
Confirm door direction and available clearance
Check whether the entrance opens inward or outward and whether the product expressly supports that arrangement. Many common domestic chains and hotel-style guards are designed around inward-opening geometry. Do not reverse the parts and assume the same product works on an outswing door.
Open the door through its normal range and inspect what moves past the proposed fitting. Consider the handle, closer, seals, nearby wall and any glazing beads. A device that catches the frame or strikes the wall during ordinary use is poorly positioned even if it engages while closed.
For a double door, establish which leaf is active and where the receiving component can obtain appropriate support. The meeting edge between two moving leaves is not automatically equivalent to a fixed jamb.
Permission and rated-door requirements come first
In an apartment, rented property or managed building, obtain the required approval before drilling. A door may be part of a fire-protected route or tested assembly, and additional holes or restraints can affect more than its appearance.
Discuss the intended release with everyone who uses the entrance. A fitting placed beyond someone’s reach or requiring difficult finger movements can obstruct practical exit. An extra inside-key mechanism should not be selected without checking the applicable requirements.
Do not treat a product sold for domestic use as proof it is suitable for every home entrance. The door and building requirements determine which changes are acceptable.
Check what is behind the mounting surface
The door-side plate and frame-side attachment both need suitable support. On timber, inspect for splits, rot and old holes. On metal, composite or uPVC assemblies, identify the manufacturer’s approved preparation and reinforcement rather than assuming the outer surface can hold arbitrary screws.
Decorative casing can conceal a gap or unsuitable substrate. A longer screw may help only when it is specified for the installation and engages appropriate material without damaging hidden services or glazing. Length alone does not make a fixing secure.
If the old chain has pulled loose, do not simply cover the damaged area with a larger plate. Assess the supporting material and repair it appropriately before installing another device. The same failure can recur if the underlying weakness remains.
Chain and swing-bar layouts differ
| Feature | Chain guard | Swing-bar guard |
|---|---|---|
| Restraint | Flexible chain between two attachments | Rigid pivoting arm engaging a compatible receiver |
| Alignment concern | Chain reaches the release slot without excessive slack or interference | Arm and receiver meet at the correct spacing and plane |
| Typical adjustment | Position established by the product’s layout instructions | May use specified spacers or handed components |
| Common mistake | Mounting to thin trim or reversing slot orientation | Forcing mismatched parts together or using improvised packing |
| Acceptance check | Normal release and limited opening without loose fittings | Smooth engagement and disengagement throughout intended movement |
Use the manufacturer’s template for the exact product. Two similar guards can require different offsets, screw positions and spacers, so measurements from a photograph are not an adequate installation guide.
Example: a conventional chain guard
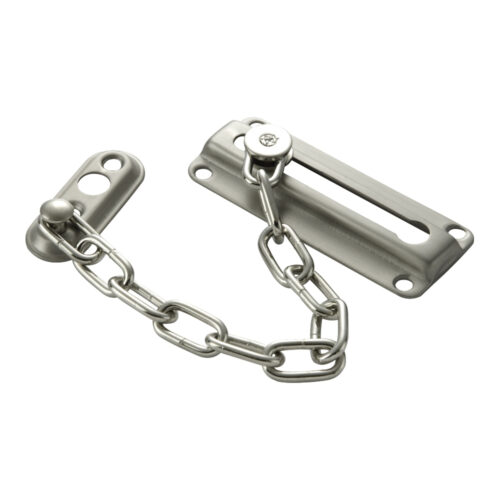
For this particular model, First Watch specifies the long plate near the door edge, with the large release opening facing away from the jamb, and positions the chain holder so the end reaches that opening. The manufacturer also provides a specific pilot-hole size and plate offset. Consult those instructions directly rather than applying the dimensions to another chain or substrate.
The general lesson is to check the release geometry before drilling. A chain that looks correctly centered may be awkward to engage or may interfere with the door because the plate has been reversed or the anchor placed without testing the movement.
Lay out both parts before drilling
Hold the components in their intended positions with the door closed and controlled. Mark the layout using the supplied template or documented method. Check the device at a height usable by the intended occupants, subject to the manufacturer’s constraints and applicable requirements.
For a chain, confirm that it can be engaged and removed normally without needing to pull fittings away from the surface. For a rigid guard, confirm that the arm and receiver align without twisting. Use only specified spacers or mounting components where required.
Then open the door with the components temporarily held clear and check the surrounding clearance. Do not rely on adhesive tape to restrain an actual opening test with force; this stage is only for layout and visual checks.
Prepare appropriate pilot holes
Use the drill size and depth specified for the supplied fastener and substrate. A hole that is too large can reduce the intended engagement, while a poorly positioned or unnecessarily deep hole can damage nearby material. A stop or suitable depth control is useful when the instructions specify a limited depth.
Wear the protection required for the tool and keep the door stable. Do not drill into an unidentified glazed profile, concealed wiring route or metal reinforcement without the appropriate information. If the required construction is unknown, pause for assessment.
Keep old and new fasteners separate. A convenient leftover screw may have the wrong head, thread or length even if it passes through the plate.
Attach the components without distorting them
Start screws carefully and seat the fitting evenly. Do not use a powered driver to crush a plate against an uneven surface or pull a misaligned guard into position. The mounting should be firm without bending the hardware.
If the screws turn without holding, investigate the substrate rather than tightening faster. If the plate rocks, correct the permitted preparation or use the specified mounting arrangement. An improvised stack of soft packing can loosen as the device is used.
Follow the kit’s sequence for final tightening and recheck the geometry afterward. Small changes in position can affect a rigid guard more than a flexible chain.
Test normal operation in a safe sequence
First check the primary door with the accessory disengaged. It should still close, latch and lock normally. Verify that the new hardware does not strike another fitting, obstruct a seal or interfere with a closer.
Engage the accessory and move the door gently through its intended limited opening. Do not kick, shoulder or slam it as a home strength test. Observe whether components remain seated and whether the release works through the normal method.
Have each relevant occupant try the release with the door in ordinary use. A device is not successfully installed if only the installer can operate it or if someone must search for an unexpected tool to leave.
Troubleshooting after installation
| Problem | What to inspect | Do not do |
|---|---|---|
| Chain cannot reach the release opening | Correct model layout and component orientation | Add an unrelated chain extension |
| Guard binds when closed | Offset, approved spacers and receiver alignment | Force the arm or bend it to fit |
| Screws loosen repeatedly | Supporting material and correct fasteners | Ignore the recurring movement |
| Door will not fully close | Interference with trim, seals or existing hardware | Remove required seals to make room |
| Occupant cannot release it easily | Reach, dexterity and product suitability | Accept difficult exit as the price of security |
If correcting the fit requires new holes close to damaged old ones, have the support assessed. Repeated repositioning can leave a weaker mounting area even when the final arrangement looks neat.
Why extra-long screws are not universal advice
A timber jamb with suitable structural backing differs from thin metal, a hollow profile or a frame next to a sidelight. The correct fastening method depends on what lies behind the visible surface. A long screw can miss useful support or create damage if its path is unknown.
Use the manufacturer’s specified installation or an approved professional adaptation for the actual substrate. The objective is adequate support, not maximum screw length. Similar reasoning applies to reinforcing the primary strike, covered in our strike installation guide.
Visitor screening after the hardware is fitted
Use a viewer or intercom before opening where available. A chain-width gap does not establish a caller’s identity. For an unexpected service visit, verify through an independently obtained official contact rather than relying only on a badge or a phone number the visitor supplies.
You can keep the door closed and arrange another time. A useful visitor routine does not require challenging or physically confronting someone. If there is an immediate threat, use the appropriate emergency response.
For repeated deliveries, a video doorbell may help communication, but it adds power, account and recording questions. Our doorbell comparison explains that choice without treating electronics as a replacement for a working lock.
Maintenance and eventual removal
Inspect visible fasteners, chain links, hinges and the release mechanism when operation changes. Clean and maintain the product according to its instructions. Do not apply random lubricant to every surface or allow paint to bridge moving parts.
After impact or a forceful event, have the fitting and supporting material assessed. A chain that still connects may nevertheless have weakened anchors. Replacing only the visibly bent link may leave the actual damage unresolved.
If you later remove the accessory, repair the openings appropriately for the door construction and any rating. Filling a hole cosmetically does not automatically restore an approved assembly; managed or rated entrances require the appropriate repair process.
Frequently asked questions
Where should I mount a door chain?
Use the exact product’s layout and a position appropriate for the occupants and supporting material. There is no universal height or offset suitable for every door and guard.
Can I fit one to a uPVC or metal door?
Only through a compatible approved arrangement with suitable support. Do not assume screws intended for timber will work in an unfamiliar profile.
Is a swing-bar guard automatically stronger?
No category name establishes the installed performance. Product construction, frame support, geometry and fasteners matter.
Can a chain replace a deadbolt?
No. Limited-opening hardware and a primary entrance lock perform different functions. Repair the primary locking system if it is unreliable.
What should make me stop the installation?
Uncertain support, rated-door restrictions, incompatible movement or an occupant who cannot release the device safely. Resolve those issues before drilling or relying on the fitting.