How to Protect Outdoor PoE Camera Connections: Junction Boxes, Seals and Cable Routes
.sl-poe table{border-collapse:collapse;width:100%;margin:22px 0}.sl-poe th,.sl-poe td{border:1px solid #bdcbd0;padding:12px;text-align:left;vertical-align:top}.sl-poe th{background:#edf4f2}.sl-poe .table-scroll{overflow-x:auto}.sl-poe figure{max-width:850px;margin:28px auto}.sl-poe img{max-width:100%;height:auto;display:block;margin:auto}.sl-poe figcaption{font-size:14px;line-height:1.6;color:#425c63;padding-top:9px}
An outdoor camera can survive rain while the exposed Ethernet connection beside it slowly corrodes. The housing and the cable junction are separate parts of the installation. Leaving one unprotected because the product box says weatherproof is an avoidable way to turn a reliable camera into an intermittent one.
Protect an outdoor PoE connection with the camera’s compatible sealing components, an appropriate enclosure where required and a correctly specified cable route. Tape is not a universal substitute for those parts. This guide explains what to inspect and specify; it does not provide a one-size-fits-all sealant recipe for every camera.
Identify every exposed connection
Inspect the camera tail, network socket, any unused power or reset branches, intermediate couplers and building entry. A neat camera mount can conceal a loose socket immediately behind it. Identify which parts are sealed by the housing and which require separate protection.
Read the exact installation instructions before mounting. Some cameras use a supplied waterproof cap; others use a specific gland or connector system. A separate junction box may protect and organize the tails without replacing the connector treatment the camera still requires.
| Part | What to check | Common mistaken assumption |
|---|---|---|
| Camera body | Rated use, mounting and condition | Its rating covers every loose tail connector |
| Ethernet junction | Correct cap, seals and compatible cable | A wrap of ordinary tape is equivalent |
| Unused connections | Required caps and protected location | Unused means exposure does not matter |
| Junction box | Suitable model, entries, cover and mounting | Any plastic container is appropriate |
| Cable route | Jacket suitability, support and entry protection | A higher category automatically means outdoor-rated |
Take photographs before closing the enclosure, without revealing credentials or sensitive location details publicly. They can help a later technician understand how the connection was assembled.
Use the supplied connector correctly
A seal works as an assembly. The cable diameter, rubber insert, O-ring, cap and socket must be compatible and fitted in the intended sequence. An oversized plug boot or an undersized cable can make a neat-looking assembly fail to seal properly.
Do a dry fit on the bench. Check whether gland components need to be placed on the cable before termination. Do not force a connector through the seal, remove an O-ring to gain clearance or cut the cap to fit an unsuitable plug.
Reolink’s PoE powering guidance calls for the waterproof cap at the cable-to-camera junction. Other products have their own requirements, so follow the exact manual rather than borrowing the dimensions of a visually similar accessory.
What a camera junction box adds
A suitable box can house the connections, support the camera and provide controlled cable entries. It can also make a future camera replacement more practical than extracting a connector from a hole in the wall. The box must fit the camera and the environment.
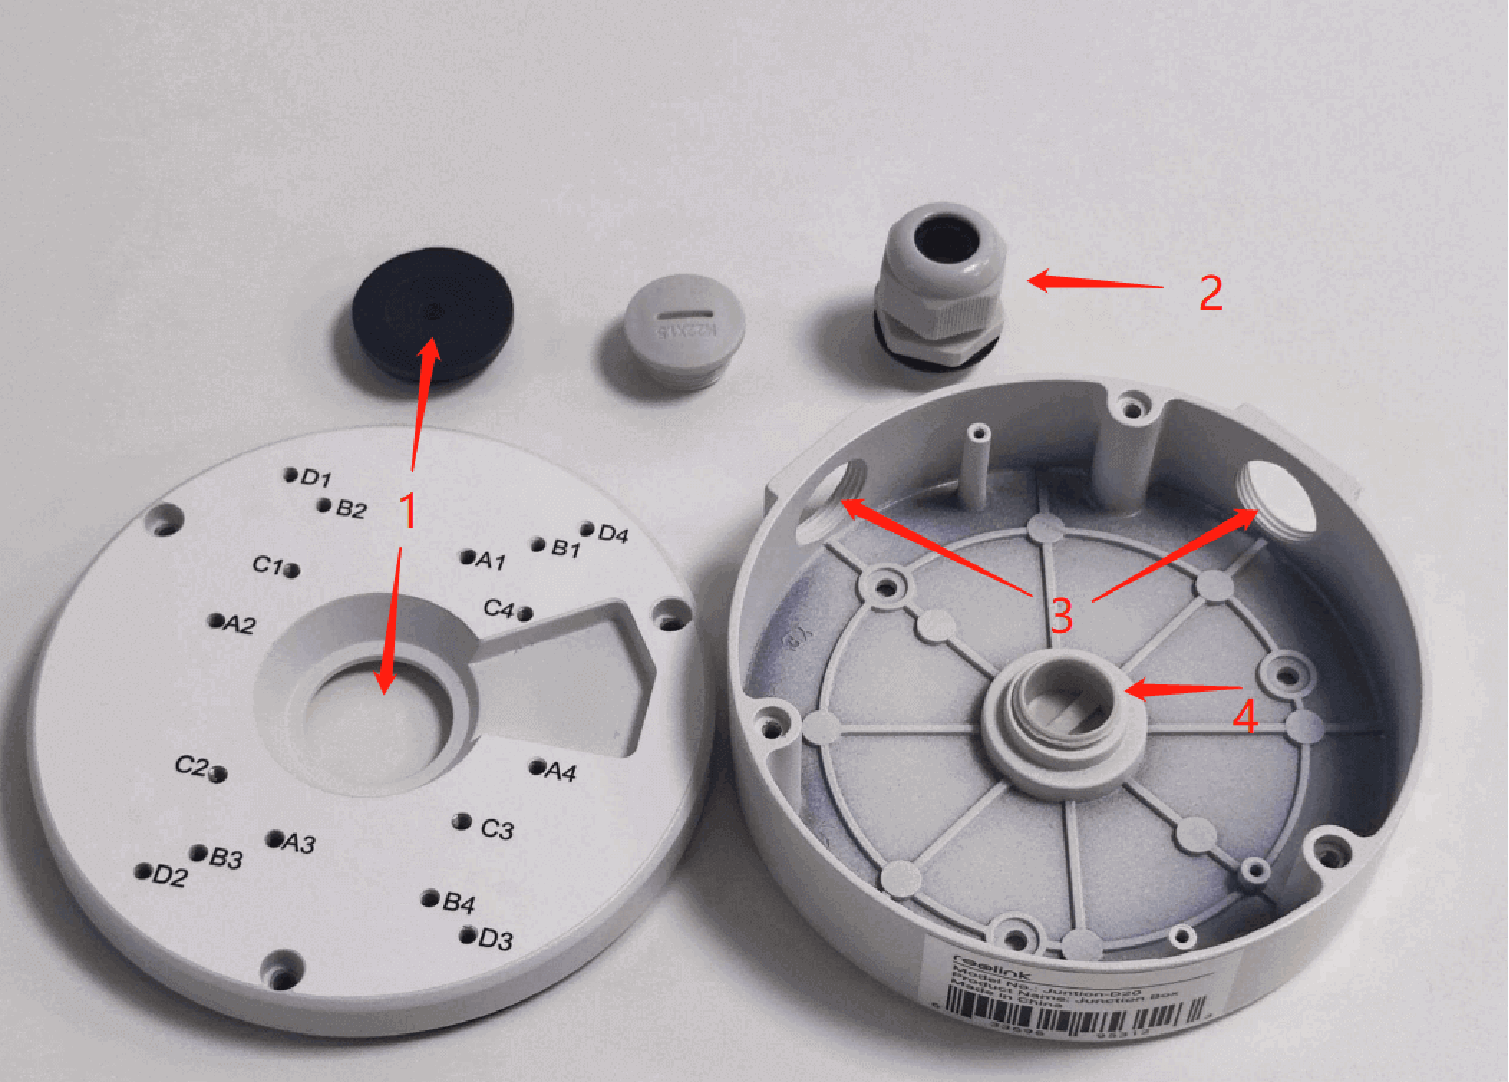
Reolink’s RLA-JBS1 guide illustrates another design with defined cable entries and seals. A box family can have different compatibility from a neighboring product line. Check the screw pattern, cable space and manufacturer list rather than ordering by brand alone.
The supporting wall or ceiling must suit the combined weight and intended fixings. Do not hang an enclosure from the cable itself or pack wires so tightly that closing the cover strains the connectors.
Cable glands need the correct cable size
A gland is not just a hole with a threaded nut. Its sealing range and intended cable arrangement matter. Passing several small leads through a fitting intended for one larger cable can leave gaps even if the nut feels tight.
Use approved entry fittings and close unused openings as instructed. Keep the gasket surfaces clean and inspect for damage. Do not replace a missing seal with whatever household material happens to fit the visible gap.
The camera cable guide connects conductor, jacket and connector selection. That is why choosing the cable and weather fittings together is easier than trying to adapt one after it is already installed.
Route water away from the junction
Arrange the cable and permitted entry orientation so ordinary water runoff is not directed into an exposed junction. Where the equipment instructions call for a drip loop, form it without violating the cable’s bend radius or creating a snagging hazard.
The precise loop, entry and seal arrangement depends on the camera and mounting system. Do not drill extra drain holes into a sealed box unless the manufacturer specifically provides that method. A change that releases water can also defeat the intended protection elsewhere.
Check roof runoff, gutters and sprinklers. A site that continually directs water at the camera may be better corrected by moving the installation or fixing drainage than by adding layers of sealant.
Choose cable for the actual exposure
Confirm outdoor and ultraviolet suitability where the jacket is exposed. Wet locations and direct burial can need additional specific suitability. Cat5e, Cat6 and Cat6A describe transmission categories, not blanket weather ratings.
Conduit can provide mechanical protection, but it does not automatically keep the inside dry or make indoor cable suitable. The complete route and building transition should meet the local installation requirements.
For a long outdoor or inter-building route, compare an appropriate alternative network design before purchasing a reel. The PoE distance guide explains why supported reach and remote power must be planned together.
Do not hide an unsuitable device inside a sealed box
An indoor switch or injector can have temperature, humidity and ventilation requirements that an improvised exterior enclosure cannot satisfy. A box that excludes rain may still trap heat or develop internal moisture. Check the complete arrangement rather than only the enclosure’s label.
Use purpose-designed equipment and enclosures where appropriate, with competent installation. Keep mains connections within their approved environment. A camera powered over Ethernet does not remove the electrical requirements of the device supplying that power.
The power-source comparison helps identify which component belongs where. Avoid placing the injector next to the camera merely because it shortens one visible cable.
Moisture on a cover is different from water inside a connector
External condensation can affect the image without proving the electronics enclosure has failed. Water inside the network junction, corrosion or recurring internal fogging calls for a different assessment. Record where the moisture appears and the conditions in which the fault occurs.
Do not keep reconnecting a visibly wet or damaged electrical assembly. Isolate the relevant power through the approved procedure and arrange inspection. Avoid direct heat, solvents or improvised contact treatments unless the manufacturer explicitly authorizes them.
A camera that reconnects after drying has not necessarily been repaired. The original water path may remain, and corroded contacts can create intermittent faults later.
Note the affected camera, timing, weather and whether the recorder or switch also changed state. Check accessible exterior components only from a safe position. Do not climb during a storm or open powered equipment to investigate immediately.
Once it is safe and authorized, have the connection and cable assessed. A controlled comparison using a compatible source and a short known-good cable can help distinguish the camera from the installed route. Keep the original assembly identified rather than swapping every part at once.
If the image remains available but recordings are missing, use the recording guide as well. A weather coincidence does not prove the physical connector is the only fault.
Surge protection and bonding are a separate design task
Weather sealing prevents certain environmental exposure; it does not provide all the protection needed against electrical surges. Long exposed copper and connections between buildings deserve an appropriate assessment.
Axis’s surge-protection guidance describes placement of protective devices and its cabling requirements. Effective protection depends on the specified installation and bonding. Do not attach an improvised ground wire or assume an accessory makes direct lightning exposure harmless.
Consult a qualified installer for the building and local electrical context. A data link using fiber can change conductive exposure, but remote equipment still needs suitable power and protection.
Keep the image usable after protecting the connection
A large box or protective hood can intrude into the view or reflect infrared illumination. After installation, review the scene in daylight and darkness. A neat weatherproof assembly is not complete if it produces a white haze across nighttime footage.
Keep lens covers clean using the maker’s approved method. Do not spray a generic water-repellent product onto optics or seals to avoid maintenance. Coatings and materials can have specific care requirements.
Our nighttime blur guide helps distinguish glare and optical moisture from network disconnections. These can coexist but should not be treated as one setting problem.
Maintenance without repeatedly disturbing seals
Follow the inspection interval and care instructions for the equipment and environment. Check after relevant building work, a severe weather event or visible damage. Avoid opening sealed connections unnecessarily just because a calendar reminder appeared.
Record what was inspected and whether the image, power and recording tests passed. Keep replacement parts identifiable so a future repair does not substitute an unsuitable cap or gland that merely looks close.
Salt exposure, vibration and temperature extremes may call for a different maintenance plan from a sheltered domestic porch. Ask the supplier about those conditions before buying rather than relying on a generic outdoor label.
Final installation checks
| Check | Acceptable result |
|---|---|
| Camera and box fit | Approved components and secure supporting surface |
| Network junction | Correct compatible seals, with no strained or exposed connection |
| Unused tails and entries | Protected as the manufacturer requires |
| Cable route | Suitable jacket, support and building entry |
| Electrical protection | Relevant professional assessment and documented installation |
| Actual operation | Stable power, useful night image and retrievable recording |
Keep photographs and product details with the overall installation record. They make later servicing less dependent on guessing what lies behind the camera.
Frequently asked questions
Is electrical tape enough to waterproof a camera connector?
Do not treat it as a universal replacement for the specified connector and enclosure. Use the actual manufacturer’s sealing arrangement and any approved additional treatment.
Does every outdoor camera need a separate junction box?
Not necessarily. The mounting and connector design determine what is required. A compatible box can improve protection and servicing, but it must be part of an appropriate installation.
Can I drill a drain hole in a sealed enclosure?
Only where the manufacturer provides an approved procedure. An improvised hole can compromise the intended protection rather than solve the underlying moisture problem.
Should I keep using a corroded connection if the picture returns?
Have it assessed and correct the cause. Temporary recovery is not evidence that the connector or cable remains dependable.